Creating A Basic Chrome Extension In Five Minutes

How to create a basic Chrome Browser extension
Published on May 29, 2019 by Mike Chilson
Browser Chrome Extension Programming
5 min READ
Have you ever wondered how difficult it would be to create your own Chrome extension? What the process would be or what it would entail? Well, it turns out it is easy to get started. In this post, I will show you how to create a very basic Chrome extension in about five minutes.
####What is a Chrome Extension?
They are small software programs that can modify and enhance the functionality of the Chrome browser. Chrome extensions extend Chrome’s capabilities. You write them using HTML, CSS, and JavaScript.
What can extensions do? Extensions can do quite a lot. They use either page actions or browser actions. They can’t use both. A page action is a chrome extension that is specific to certain pages. You will usually see a UI added in Chrome’s address bar. A browser action is not specific to a page and is relevant no matter where you are in the browser. You will usually see a UI added to the right of the address bar. Ready to start?
####What we need We need three basic files to make a minimal Hello World extension. They are:
manifest.json icon.png popup.html
You can download these files by clicking here or follow the instructions below on how to create them. First, let’s talk about what each is and what it does.
manifest.json This file allows you to define the name of your extension and description. This name and description are basically used by chrome to display details about your extension in the extension window. Not only that but if you upload your extensions to Web store, it is used to display those details online as well. Save the following code as manifest.json :
{
  "manifest_version": 2,
  "name": "Hello World",
  "description": "This extension shows the hello world HTML page",
  "version": "1.0",
  "browser_action": {
    "default_icon": "icon.png",
    "default_popup": "popup.html",
    "default_title": "Hello World"
  }
}
icon.png is the icon image which will be used as the logo for your extension. It is 19px x 19px in dimension. You can easily create it online at sites such as pixlr.com or you can download the simple one I created by right-clicking and saving the icon below:
![]()
popup.html is the HTML page that will form the “window” when you click on the extension logo (icon.png) in the extension bar. Now, as we had decided that we require a window which is 300px in width, 80px in height and displays the text Hello World, we shall create an HTML file accordingly. Here is the code for helloworld.html
<!doctype html>

<html lang="en">
   <head>
      <meta charset="utf-8">
      <title>Hello World Extension</title>
      <style>body{width: 300px; height: 80px; text-align: center;}</style>
   </head>

   <body>
      <hr>
      <p><h3>Hello World</h3></p>
      <p>My first Chrome Extension<p>
      <hr>
   </body>
</html>
####Loading our extension and trying it out
Now that you have got all your resources ready, let us begin with installing your first Chrome extension!
First, you must be aware that you are loading this extension as a developer and not installing it from Chrome Webstore. The difference is that the files are literally read from the location you tell Chrome to read them from. Make a static folder in your hard disk. By static, I mean, make sure you won’t rename this folder later, else your Chrome extension will stop working. For this example, I will be using the following newly created folder in my hard disk on Linux under the html-projects directory I have.
mkdir ~/html-projects/hello-world-extension
Place all the files created above, i.e. icon.png, popup.html and manifest.json in this folder.
Now open Chrome and type in chrome://extensions in the address bar and press [Enter].
Make sure you turn on Developer Mode and then click [Load unpacked].

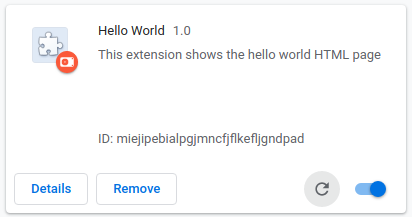
Browse and select the newly created folder in which you had saved the files. Now you can see the newly created extension is added to your Chrome Extensions :

Make sure that it is Enabled. You can now see your newly added extension icon to the right of the Address Bar in your Chrome browser. Now go click it!

You did it!
####Moving on…
Obviously, this is a very simple extension but it shows you the basic process of creating one. Ready to learn more?
Check out these links and work through them:
Google’s Extension Documentation https://developer.chrome.com/extensions/overview
An advanced example with JavaScript https://thoughtbot.com/blog/how-to-make-a-chrome-extension
Build a Page Speed Analyzer Extension https://www.techjunkie.com/build-chrome-extension/
How to publish your extension to the Chrome Web Store https://developer.chrome.com/webstore/publish
I hope you found this simple tutorial helpful to get you started. If you have any questions please use the Contact Me form on the site menu to send me an email.
Good luck! Mike